
13 posts tagged with "Azure"

View All Tags
Azure

· 3 min read

Test copy from ourcloudnetwork.com

In this tutorial, I will show you how to create a new local administrator account on your Windows devices using Microsoft Intune. While there are a few preferred methods among professionals and MVPs for creating local admin accounts, here we are going to use a simple PowerShell script for the detection and creation of the account.

It is often questioned why you need the added complexity of creating a new local admin account and why you cannot just use the built-in Windows account instead. Well, the rationale behind this can be broken down quite simply into the following points:

  • The built-in administrator account has a well-known SID. Even if the account is renamed, it can be easily enumerated by an attacker.
  • The account cannot be locked out by default. This makes it susceptible to brute-force attacks. (As of October 11, 2022, account lockout can be enforced on this account, but it is not enabled by default).
  • CIS recommends you don’t use it. The Center for Internet Security (COS) provides well-respected recommendations for best practice configurations across a variety of products within the industry. Sometimes companies must simply conform to policy and adhere to a standard to meet compliance requirements.

Really simple local admin account

The process of creating a local admin account on Windows devices using Microsoft Intune can be summarised in the following steps:

  1. Create a PowerShell script to detect if the account is present and is a local administrators group member.
  2. Create a PowerShell script to create the account if it doesn’t exist and add it to the local administrators group.
  3. Upload as a remediation script package to Intune

You must consider with this approach that you should have a method to change and manage the password for the account after it has been deployed. The best way of doing that is to use Windows LAPS with Microsoft Entra and Intune.

Detection script

<#
Written by Daniel Bradley
https://ourcloudnetwork.com/
https://www.linkedin.com/in/danielbradley2/
#>

#The name of the account
$AccountName = 'localadmin'

#Check if user exisis
$Userexist = (Get-LocalUser).Name -Contains $AccountName
if ($userexist) {
Write-Host "$AccountName exists"
}
Else {
Write-Host "$AccountName does not Exists"
Exit 1
}

#Check if user is a local admin
$localadmins = ([ADSI]"WinNT://./Administrators").psbase.Invoke('Members') | % {
([ADSI]$_).InvokeGet('AdsPath')
}

if ($localadmins -like "*localadmin*") {
Write-Host "localadmin is a member of local admins"
exit 0
} else {
Write-Host "localadmin is NOT a member of local admins"
exit 1
}

Remediation script

<#
Written by Daniel Bradley
https://ourcloudnetwork.com/
https://www.linkedin.com/in/danielbradley2/
#>

#The name of the account
$accountName = 'localadmin'

#Add system.web assembly
Add-Type -AssemblyName 'System.Web'

#Check if user exisis
$Userexist = (Get-LocalUser).Name -Contains $AccountName
if (!$userexist) {
$password = [System.Web.Security.Membership]::GeneratePassword(20,5)
$Securepassword = ConvertTo-SecureString $Password -AsPlainText -force
$params = @{
Name = $accountName
Password = $Securepassword
}
New-LocalUser @params
}

# Add the account to the Administrators group
Add-LocalGroupMember -Group "Administrators" -Member $accountName

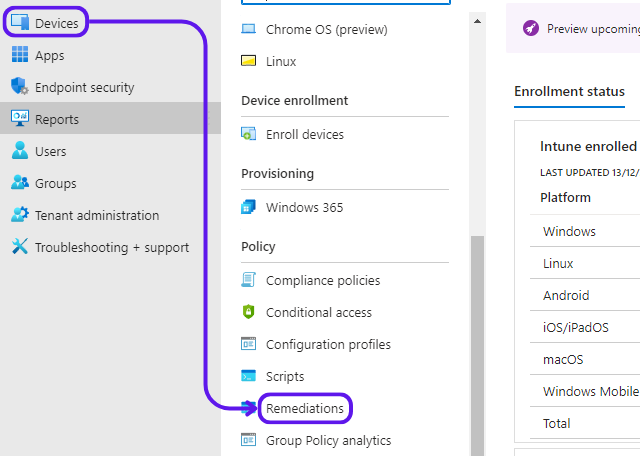
Uploading the remediation script to Microsoft Intune

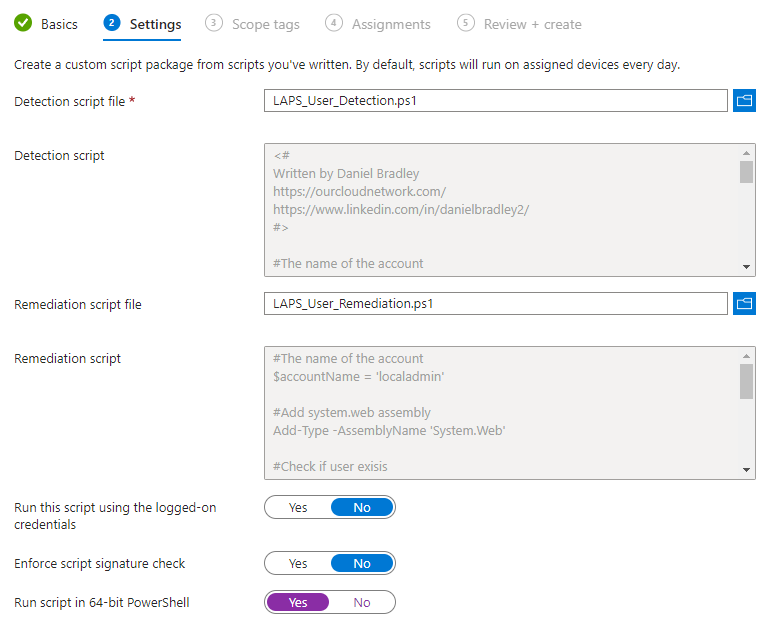
Both the detection script and remediation script first need to be saved into a PowerShell file. You can do this by copying and pasting each of the above scripts to a notepad file and saving them with the .ps1 file extension. Once you have done that follow the below steps to upload them to Intune:

  1. Log in to Microsoft Intune.

  2. Select Devices then Remediations.

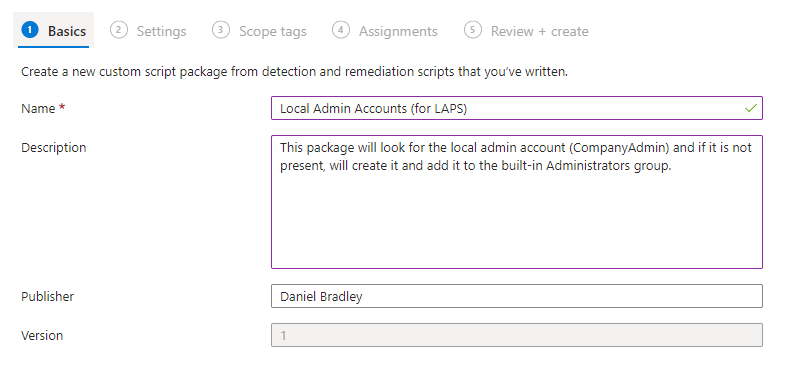
  3. Select Create Script package.

  4. Define the basic remediation settings such as the name of the package and a meaningful description.

  5. On the settings page, upload both script files to the corresponding location, then ensure the script is not run in the users context and the enforce script signature check is set to No. As all of the workstations in scope of this package should be 64-bit, set Run script in 64-bit PowerShell to Yes.

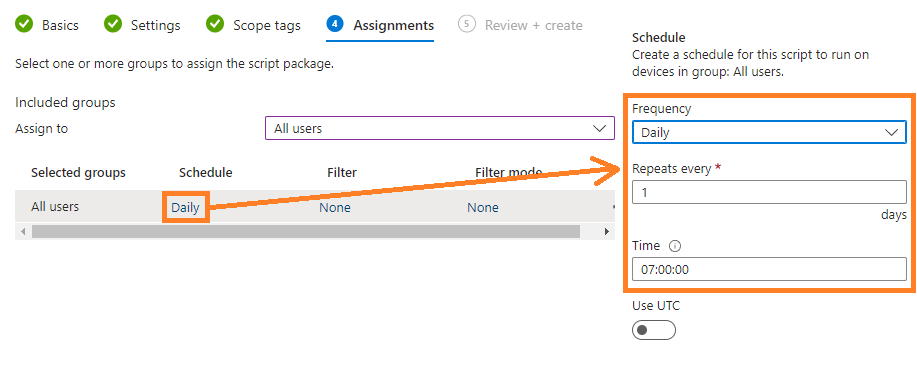
  6. On the Assignments page, assign the package to the target group of users and define the frequency at which the remediation package will run.

  7. Then click Create.

Monitoring deployment progress

You should allow the remediation package some time to run based on the schedule you defined. Otherwise you can run the remediation package manually on a target device as a test from the Intune devices blade.

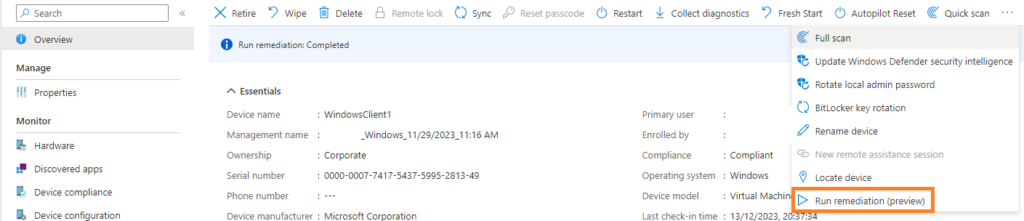
To monitor the status of your deployment, select the remediation package and click the Overview menu option. You will immediately see a high level overview of the total devices that have been detected and remediated. You can also see more detailed information on the Device status menu page, like below:

Azure

· 4 min read

Test copy from ourcloudnetwork.com

Access Reviews in Microsoft Entra provide a way to continuously review access to resources in your tenant. More importantly, you as the owner of your tenant can enable resource owners (of groups or Teams) to govern external users’ access to said resources themselves, thus reducing your workload and shifting the responsibility.

Many organisations rely on the collaboration features available in Microsoft 365, like Microsoft Teams, to work with external organisations on projects. A convenient way of doing this is by inviting said external users as guests to your organisation, this comes with its governance challenges, which Access reviews will solve.

Access reviews for group owners are disabled by default. To enable this feature, log in to your Microsoft Entra tenant as a Global Administrator and follow the below steps:

  1. Expand Identity Governance and select Access reviews.

  2. Select Settings, then enable Group owners can create and manage access reviews for groups they own.

Enable Group owner access reviews with Microsoft Graph PowerShell

You can also enable this feature using Microsoft Graph PowerShell.

(For steps on installing the Microsoft Graph PowerShell SDK, check out my post here.)

Connect-MgGraph -scopes Policy.ReadWrite.AccessReview

$params = @{
isGroupOwnerManagementEnabled = $true
}

Update-MgBetaPolicyAccessReviewPolicy -BodyParameter $params

Create a new access review as a group owner

Any user who is the owner of a group will now be able to create access reviews for groups they own through the Microsoft Entra admin center. Follow the below steps to create a new access review.

  1. While signed in to your standard user account (without any roles) open the Identity Governance Access Reviews blade.

  2. Click New access review.

  3. On the Review type page, you will only have the option to set the Review scope to Select Teams + groups. Click Select groups and you will see only the groups you own, choose your target group and click Select.

  4. In our scenario, I am going to create a single-stage review for the group owners to conduct. On the Reviews page, you will have the option to select specific reviewers.

    I suggest you select Group owners as the reviewer. Then create a fallback reviewers group with appointed users. If a groups owners no longer exist (they leave the organisation for example), the fallback reviewers will be alerted of the review and can continue to maintain governance over the group.

    You should also select the duration, recurrence and end date of the review, here are my recommendations:

    • Duration: 2 days
    • Review recurrence: Monthly
    • End date: Never

    When managing guest users, there should never be a time when their access to your data is not being governed or reviewed. Of course, change these settings to as you prefer, but ensure the end date is set to never when reviewing guest users.

  5. The Upon completion settings allow you to define important settings around automatic remediation.

    • Auto-apply results to resource: If the user’s access is denied, their access to the resource will be removed automatically after the review is completed, otherwise manual remediation is required.

    • If reviewers don’t respond: I have chosen No change, however, for the most governance, I recommend selecting Remove Access. All options include:

      • No change
      • Remove access
      • Approve access
      • Take recommendation
    • Action to apply on denied guest users:

      • Remove the user’s membership from the resource
      • Block the user from signing in for 30 days, then remove the user from the tenant.
    • At end of review, send notification to: Sends a notification to specific users.

  6. For the remaining options on the settings page, while they do not impact the outcome, they enable you to review notifications and reminders for the review and also provide helpful information such as the last sign-in date for the guest user. This will help you decide on whether to remove access or not.

  7. Click Review + create, then define a review name and click Create.

Completing the Access Review

When the access review begins (as defined by the start date within the review settings), the reviewer of the group will receive a notification email with a link to start the review.

The link will take them to the Access reviews blade within https://myaccess.microsoft.com/. You can also navigate directly to that link and then select the name of the access review you want to begin.

As you can see, Entra is recommending that because the user has been inactive in the tenant for over 30 days, it should be denied access to the resource.

Once access is denied, it will show as denied in the list. This action can be reversed if an incorrect decision is made.

Impact of denying access in an Access review

Once the reviewer has actioned the review and denied the guest access to the resource, once the review is complete, the guest access will be removed from the resource.

This only happens once the duration period is finished and not instantly. For example, if the review duration is 2 days and you deny access on the first day, the guest will still have access for anther day, before their access is removed.

Wrapping up

Access reviews are a powerful tool to ensure that guest users in your tenant do not retain access to resources for longer than they need. In this post, I have demonstrated how to can delegate permission to create access reviews to the owner of groups and hence collaborative resources in your tenant.

This ensures guest users are governed in larger organisations where it would not be feasible for a single team to manage them and maintain responsibility for them.

Azure

· 4 min read

Test copy from ourcloudnetwork.com

Break-glass accounts are a vital piece to your disaster recovery model. They should be implemented to ensure that when all else fails, you have an entry route back into your organisation. One of the issues is that while they may have been a good thought when they were created, after time, they may not be considered when implementing additional controls, such as Conditional Access policies. This post looks to address and remediate that problem.

Break-glass or emergency access accounts are highly privileged (global admin) accounts intended for use, only when all other administrative access is locked out. Effectively, they are the solution to your worst-case scenario, when you have lost access to your primary administrative accounts and the tenant is locked out.

Break-glass accounts should not conform to any other security controls you have in place in your tenant. They are designed to be used without enforcement of Security Defaults or Conditional Access, as them policies often are the cause of the lockout. As such, it is recommended (and essential) that you avoid the use of Security Defaults and enforce Conditional Access policies with user exclusions for your break-glass accounts only.

Why break glass accounts need protecting

Throughout the natural lifecycle of your Microsoft 365 tenant, policies, controls and user configurations change due to varying factors, some examples may include:

  • The adoption of new integrated software solutions.
  • Improvement of existing security controls.
  • Onboarding and offboarding of IT staff.

Some of these changes may directly or indirectly impact the usability of your existing break-glass accounts, making them not so useful. This means it is important that you appropriately document your break-glass configuration, making it available to only those who need it and also frequently validate its configuration.

Resolving Conditional Access break-glass exclusions with Microsoft Graph PowerShell

To ensure you can always log in to your break-glass accounts, it is important that they are excluded from any Conditional Access policy in your environment. Excluding the account from all policies, even when some may not impact the account, is a good practice regardless, in the event the scope of any policy changes without additional thought for the break-glass account further down the line.

Using Microsoft Graph PowerShell and some simple scripting logic, we can gather information about the currently enabled Conditional Access policies in Microsoft Entra and loop through each one to ensure our Break-glass accounts are excluded. We can then email the results to a destination of our choice.

The below example will do just that in a delegate access scenario. To learn more about permission types with Microsoft Graph, see How To Find Permissions For Microsoft Graph PowerShell.

Connect-MgGraph -Scope Policy.ReadWrite.ConditionalAccess, Policy.Read.All, User.Read.All, Mail.Send

#Define variables#
$breakglass = "address"
$to = "address"
$from = "address" #In a delegate scenario, this must be the account as your current session

#Get breack glass user Id
$userid = (Get-MgUser -userid $breakglass).id
$policies = Get-MgBetaIdentityConditionalAccessPolicy -Filter "State eq 'Enabled'"

#Generate empty arrays
$Report = [System.Collections.Generic.List[Object]]::new()
$log = @()

#Loop through policies, update and build report
Foreach ($policy in $policies){
If ($userid -in $policy.Conditions.Users.ExcludeUsers) {
$bgline = "Already excluded"
$log += "No action required for policy: $($policy.DisplayName)`n"
$action = "[No action Required]"
} else {
$policy.Conditions.Users.ExcludeUsers += $userid
try {
update-MgBetaIdentityConditionalAccessPolicy -ConditionalAccessPolicyId $policy.Id -Conditions $policy.Conditions -erroraction stop
$bgline = "Break glass account added"
$log += "Break glass account exlcluded for policy: $($policy.DisplayName) `n"
$action = "[Remediated]"
}
Catch {$log += "Unable add breakglass account to policy: $($policy.DisplayName)" + $_ + "`r`n"}
$action = "[Action Required]"
}
$item = [PSCustomObject][ordered]@{
"Policy Name" = $policy.DisplayName
"Last modified" = $policy.ModifiedDateTime
"Break Glass" = $bgline
}
$report.Add($item)
}

#Message body
$report = $report | ConvertTo-Html
$Report = $report -replace '<table>', '<table border="1">'

#Message attachment
$encodedBytes = [System.Text.Encoding]::UTF8.GetBytes($log)
$MailAttachment = [System.Convert]::ToBase64String($encodedBytes)

#Send message
$body = @{
message = @{
subject = "$action Break glass policy review"
body = @{
contentType = "HTML"
content = "$report Please see the attached for further information"
}
toRecipients = @(
@{
emailAddress = @{
address = "$to"
}
}
)
attachments = @(
@{
"@odata.type" = "#microsoft.graph.fileAttachment"
name = "log.txt"
contentType = "text/plain"
contentBytes = $MailAttachment
}
)
}
saveToSentItems = "false"
}
Send-MgUserMail -UserId $from -BodyParameter $body

The output of the script will look like the following:

Automating on a schedule with Azure Automation

By automating the above script you can guarantee that it runs on a defined schedule without the need for any physical action. It will also ensure that if a breaking change is made to your existing Conditional Access policies or any new policies, it will automatically be remediated by excluding the break-glass account. There are a few requirements for this step, you will need:

Use the above links to set up an Azure Automation account and assign the relevant permission to the associated Managed Identity; Policy.ReadWrite.ConditionalAccess, Policy.Read.All.

Modify the script to use a Managed Identity for authentication

To run our script on a schedule securely from the Automation Account, we must modify the script slightly so it uses the managed identity for authentication. To do this, change the first line of the above script to the following:

Connect-MgGraph -Identity

I like to test this using the Runbook Test pane before publishing it to production. While editing your Runbook, select Test pane.

From here you can execute your script to validate it is functioning as expected.